Showing posts with label Cardinals & Birdhouse. Show all posts

Saturday, June 20, 2020

Christmas Wishes from the Cardinals

Hello Scrapping Cottage friends! Thanks for taking the time to stop and visit with us today. It's Mary Marsh here bringing you the Saturday edition of the Blog. Happy first day of summer to all of you in the northern hemisphere!

It's Father's Day weekend and time to celebrate all the great Dad's and Granddad's. The team has shown a lot of Father's Day card ideas using our new Gardening dies. So hopefully you got some fresh inspiration when you created a card for your special guy. 

Today, though I am going in a different direction with my card. I am featuring an older Christmas die - Cardinals & Birdhouse and I created a Christmas card. So let's get started with some details on how I created this card.

Design Steps:

My inspiration to create a Christmas card came from the color challenge #796 on Splitcoaststampers. When I saw the colors just I just thought of Christmas. 

When I started thinking about my card, I remembered I had a pack of beautiful frosty winter themed designer papers. I chose this pine tree one that was covered in snow and ice and knew it would be perfect for a scene with cardinals in it. And, my card was born!

The navy color is considered a neutral in this challenge so that color was a go. I took a photo of the entire 6 x 6 piece of cardstock because I wasn't quite sure at this point where I was going to cut the paper.  

White card base: 4 1/2" x 5 3/4"
Navy blue layering panel: 4 1/4" x 5 1/2"
Designer paper layer: 4 1/8" x 5 3/8"
I cut the birdhouse and cardinals in the challenge colors. I used a navy panel as an accent on the birdhouse. The branch is cut in a soft brown cardstock a neutral shade.

My Christmas wishes sentiment is stamped in garden green ink to satisfy that part of the challenge. 

My elements are cut and I am ready to start card assembly. I attached the designer paper to the layering panel first using double sided tape.
Next, I attached the die cut images using a combo of glue dots and ranger multi medium matte. This one dries clear so I like using it on diecuts.
For the sentiment I cut the banner and used dimensional adhesive to secure it to the top of the card. 
To finish off my card, I attached the image panel to the card base. Added a couple of red glitter enamel dots to highlight the sentiment. And, then scattered a few more and my card is finished. A  Christmas card ready for the December stash.

Well, that's it for me for this post. See you next Saturday! 

Dies I used to create card:


Thursday, November 01, 2018

Fall Color


Good Morning Scrapping Friends!

Hello it is Pam creating on the blog with you today!

Thanksgiving is such a wonderful holiday.  It gives us time to stop and reflect on how blessed we are.  And after giving our thanks we get to enjoy a yummy meal with family and friends.

I am almost finished with my Thanksgiving cards but I could not resist making one more card with some gorgeous Fall Leaves on it.

Design Steps:
 1.  Cut all pieces out of white card stock using the Fall Leaves dies
 2.  Sponge the leaves with TH Distressed inks
 3.  After sponged take the leaves and coat them with Versa Mark ink.  After you coat them with ink dip them into clear embossing powder
 4.  Heat set the leaves with your heat gun.  The colors will really pop!
 5.  Use an A2 white card base, cut a slightly smaller piece of black card stock.  Then use a piece of DP and cut it slightly smaller then the black.  Glue the black and DP to the front of the white card base
 6. Cut a dove tail black banner 5 x 2 3/4 inch and then a slightly smaller piece of burlap to layer over the black

7.  Begin to layer the leaves onto the banner working from the bottom to the top.  Cut out the brown twigs using the Cardinal & Bird die tuck them into the leaves as shown.  Add the sentiment and button then your card is complete
CottageCutz Products


Let us all be extremely thankful for all that we have especially when we have time to create and have a little fun!

Blessings
Pam

Thursday, July 26, 2018

Christmas Cardinals

Good Morning Crafty Friends!

It is Pam sharing with you today.

Great news CottageCutz is having a Christmas in July sale!  You can save up to 65% on Christmas dies like the one I am showing you today!

CottageCutz isn't having a new release this month so we are pulling out older dies and giving them a fresh new look. We are calling it our throw back month!

In South Carolina we have a large population of beautiful Cardinals.  I just love watching them out of our back windows.  They are such gorgeous birds.  And I love the bright red against our very green backdrop.  So with that said those sweet birds were my inspiration for today's card.

Design Steps:
 1.  Cut all of the pieces out of white card stock using the Cardinals & Birdhouse die and the second to the largest Nested Stitched Scallop Circle die
 2. Color the pieces with your markers then assemble the birds and bird house
 3.  Place the die back over the scalloped circle. Use a cloud template and a sponge dabber to create the clouds.  Move the template down and continue creating the clouds
 4.  When you are finished you will have a nice clean edge
 5.  Use a white A2 card base cut a red checked piece of DP 5 1/4 x 4.  Also cut a piece of green checked DP 5 x 3 3/4.  Glue the pieces to the front of the white card base.  Add 2 1/4 x 3 3/4 in pieces of red checked DP toward the bottom of the card
 6.  Glue the birds and the birdhouse to the scalloped circle as shown
7.  Using dimensional tape mount the birds to the front of the card and add the sentiment.  Last add a little Stickles to the birdhouse roof for some glittering snow.

Cottage Cutz Products


Thanks again for stopping by to visit!  Make sure to start your Christmas cards early and shop our wonderful sale!
Blessings
Pam

Saturday, December 10, 2016

Holiday Wreath

Hello Scrapping Cottage friends! Thanks for taking the time to stop and visit today. It's Mary Marsh here bringing you the Saturday edition of the Blog.

Well, it's 2 weeks until Christmas. I can't even believe it as I am typing this blog post. Are you in panic mode yet? I am so behind with all I want to do and I am still making Christmas cards. This one is on the CAS side and would be very easy to create about 10 of them quickly. Are you getting a hint here on how many I need (lol)?

So if you still need some cards here is an idea for you. Let's get started with some details on how I made this one.

Kraft Card Base: 4" x 5"
Kraft Pierced Wide Rectangle: 3 3/4" x 4 3/4"
Vanilla Sentiment Layer: 3 7/8" x 4 7/8"

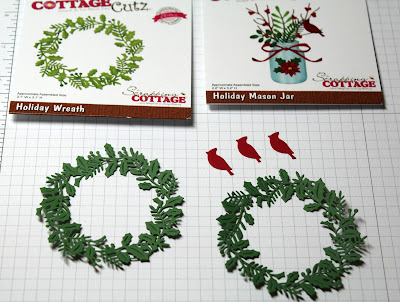
I wanted to make a card with a wreath and the Holiday Wreath was just perfect for what I had in mind for my card. I cut it out 2x in a ivy green textured cardstock. This cardstock is a lighter weight and I thought it needed a little more dimension. I layered the 2 wreaths together with Ranger multi-matte medium. 
Next I cut my frame from Kraft cardstock with the pierced wide rectangle set.  I decided not to use the smaller cardinals on the above picture but I did use the bow from the Holiday Mason Jar die set for my wreath. I went for the bigger cardinal from the Cardinals & Birdhouse die set. I stamped a seasons greetings sentiment in red ink and that took care of all the pieces I needed for my card.
 
 
Now that everything is cut I started the assembly of my card. I was going for the tone-on-tone look so I used dimensional foam tape on my frame to lift it off the card base. It gives it a little more depth since the card base is also Kraft. I attached the vanilla layer to the back of the frame with double sided tape.
 
On my wreath I used some red half pearls for berries. I used foam tape just at the top of the wreath to attach it. I didn't want it to be flush against the vanilla layer. The cardinal was placed in the center to complete this card. This close up shows the detail on the wreath as well as the cardinal. If you click any of the photos it will give a bigger image.
 
That's it for me for this Saturday. I hope I have given you some inspiration using the holiday wreath die. So until next time........inky hugs!!!
 
http://www.scrappingcottage.com/cottagecutzcardinalsandbirdhouse.aspx

http://www.scrappingcottage.com/cottagecutzholidaymasonjar.aspx

http://www.scrappingcottage.com/cottagecutzpiercedwiderectangleframesetbasics.aspx

http://www.scrappingcottage.com/cottagecutzholidaywreathelites.aspx