Tuesday, September 19, 2017

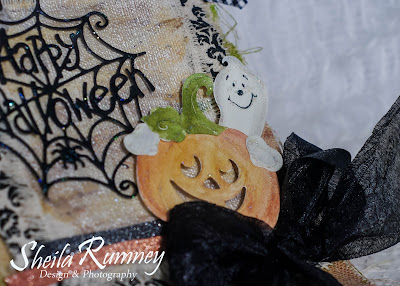
Happy Halloween Hanger

Hello creative peeps!  Sheila here to share a mixed media Happy Halloween Hanger.
I used while watercolor paper to die cut the Happy Ghost Cottage Cutz.  
I used different shades of yellow and orange watercolors to start layering color on the dies.
I continued to add layers for watercolor color in the pumpkin, stem and ghosts.  Once dried, I assembled the Happy Ghost die gluing together then adding glitter glue.
Then, I die cut black cardstock with the Happy Halloween Web.  Then adding glitter glue to add a little sparkle.

For the canvas pennant hanger, I used spritzed on glimmer mist in coordinating colors. Then I used high impact paints, in coordinate colors, to add dimension and shimmer to the canvas.  Next I layered the canvas pieces on top of the pennant hanger.  
(Created with Cottage Cutz dies, Canvas Corp Brands, Tattered Angels products and Prima Marketing Watercolors.)

Then, I added ribbons, lace, vintage button and washi tape to complete.

I hope you enjoyed a little Halloween inspiration!  Remember to go to the online store on Wednesday, Sept 20th for ordering.

Die cuts used:

CC-381 Happy Ghost
CCE-493 Happy Halloween Web

Monday, September 18, 2017

Nativity Bridge Card

Hi, Lois here with some brand-new CottageCutz Christmas dies. It's always fun to learn a new technique.  My card today actually has two techniques that I just learned -- a fun-fold and a background.  CottageCutz has a whole bunch of new Christmas dies, which will be available on their website on September 20th.  I used two of them on my card -- Away in a Manger and We Wish You a Merry Christmas.


The background technique I recently learned is called Galaxy Background, which looks like it would be much more difficult than it actually is.  To create the background you sponge various colors of Distress ink onto white cardstock.  The colors I used, in order, are: 1) Mermaid Lagoon; 2) Peacock Feathers; 3) Chipped Sapphire; 4) Seedless Preserves; and 5) Black Soot.  During the process you'll wonder how this will possibly look good; but, be patient, it comes together at the end.  As you can see, each of the colors is sponged sparingly so as not to overtake the previous layer.  When you get to the Black Soot, however, you lightly cover the entire card.  After sponging is completed, put a little bit of white acrylic paint on an acrylic block and dilute it slightly with water, mixing it together with a small paint brush.  Then flick the paint brush against the side of your finger to splash the paint onto the entire area.  Here is a photo of the six steps involved.  You can see how the colors build upon each other.


Now you can start your card.  Cut a piece of heavy weight white cardstock 4 1/4" x 8"  and score at 1 1/4", 2 1/2", 5 1/2", and 6 3/4".


My background piece was originally a white piece of cardstock 4" x 6 3/4".  Cut the sky pieces as follows:  a 1" strip, a second 1" strip, a 2 3/4" strip, and another 1" strip, leaving one final 1" strip.


Fold the card base as shown in the photo -- very similar to a double gate-fold card.


Adhere the sky pieces to each section of the card base.


Cut the sentiment and Nativity border.  I used glitter paper for each element -- pale blue for the sentiment and silver for the border.


Glue the sentiment onto the center section of the card, with the star extending just slightly off the top.  When adhering the Nativity border, just apply glue to the ends of the die cut.  Lay the card flat, with just the left side folded on the score lines.  Adhere the left side first, and then span the center and adhere the right side.


As you can see, the card will lie flat for mailing; but, when you fold both sides up, it will stand with the Nativity border "bridging" between the two end panels.  You can see in the following photos the 3-D look of this card.


Here again is the card from the front.


I hope you give these fun techniques a try.  I'm really hooked on that Galaxy Background!  

CottageCutz dies used on my card are:


Sunday, September 17, 2017

Hello Twins

Hi!

It's Anja here. Because I'm still waiting for my Halloween dies to arrive, I made a different themed card today. I bought some new skin toned Zig markers a few weeks ago and I gave them a try today. I figures Baby Doll dies are perfect for that. And that is why I made a baby card, this time to welcome twin baby boys.


For my card I used:
- Cottage Cutz dies (Baby Dolls, Hello Phrase),
- Zig markers (Blush, Tea Rose),
- Distress Oxides (Vintage Photo, Walnut Stain, Peeled Paint, Broken China),
- white card base (21x10 cm),
- white watercolor paper for die cuts and background (20,6x9,6 cm),
- alphabet stamp,
- VersaFine Onyx black ink pad,
- black pen,
- watercolor brush,
- baby wipes,
- stamping platform.

First I die cut all two baby boys figures from watercolor paper. I colored them with Zig markers and watercolor brush.


 Hair and diapers are colored with Distress Oxides. I glued all body parts together.


Then I made the background. I used baby wipes and Distress Oxides to color the edges. I colored the phrase hello the same way.


I used stamping platform to stamp the word "twins". I used black ink.


And then I just glued everything together. It would be fun to make a girl card too :)


Have fun and enjoy your Sunday.
Anja Z.

Cottage Cutz dies I used:


Saturday, September 16, 2017

Halloween Candy Jar

Hello Scrapping Cottage friends! Thanks for taking the time to stop and visit today. It's Mary Marsh here bringing you the Saturday edition of the Blog.

I am happy to report that our CottageCutz design team members who were in the path of Hurricane Irma are safe. So thank you for your thoughts and prayers.

Here in Pittsburgh fall is approaching rapidly. Next week is the first day of Autumn and our night time temps are already telling me that. With fall comes thoughts of harvest time, pumpkins, hay rides and of course Halloween.

CottageCutz has a new release of Halloween & Christmas dies coming on September 20th. Online ordering is not available right now because of a move to a larger warehouse. But, the DT has been giving you sneak peeks of what's coming. So make your wish list.

My card today is using some of the new dies: Halloween Candy Jar and Halloween Phrases & More. So let's get started with some details on how I created my card.

Step 1: I already knew the dies I intended to use for my card so I just needed my layout. Splitcoaststampers had one that I thought would work well with my candy jar image. I substituted the candy jar for the oval in the sketch. And for element #4, I used my word phrase and the spider for element #5. I also added an additional layer.
Step 2: Selected my card colors. I found some double sided designer paper in my stash from an old Halloween collection. I decided to use the dotted pattern and paired it up with olive green and  cinnamon cardstocks.
Cinnamon Card Base: 4 1/4" x 5 1/2"
Olive Green Layer: 4 1/8" x 5 3/8"
Patterned Paper Layer: 3 7/8" x 5 1/4"
Step3:  I cut my candy jar and candy in various cardstock. I just used the colors that were shown on the die packaging. So perfect for candy colors. Oh, and check out the eyeballs in the jar and the jar lid is a bat shape. Oh well it's Halloween!!
Step 4: Assembled all the pieces inside the jar. I decided to add a piece of clear acetate over the die cuts. I thought it would give a more realistic look of a glass candy jar. You can't really tell in this photo but the recipient will get the idea. Although when I photographed my card, I noticed that the photo lamp created a slight glare on the acetate.
Step 5: Time to begin the assembly of my card. Since lots of people have Halloween parties, I decided to make this one an invitation. It would be easy enough to reproduce. The phrase I used is part of the Halloween Phrase & More die. It will be available the middle of next week. So look for it in the online store. I cut it in cinnamon and olive green cardstocks to match the patterned paper.
I used dimensional adhesive on the candy jar. I like the look of it not being directly against the patterned paper. The little bit of dimension again makes it more like a real candy jar. At least that is my opinion.
Step 6:  To complete my card I secured the image panel to the cinnamon base. I cut a couple more spiders and added them to the card. The bottom right one is element 5 of the sketch and to balance the card off I added one to the upper left of my Halloween word. I also used some Wink of Stella on the spiders to give them a little sparkle.
Well that's it for me for this week. I hope I have given you an idea for a way to use this new candy jar die. Remember, to go to the online store on Wednesday, September 20 for ordering. See you next Saturday.

Dies I used to create card:


Friday, September 15, 2017

Just Treats!

Hi everyone - it's Jeanne sharing with you today.  I love Halloween.  Well, actually I love the cute Halloween decorations and the candy and the trick-or-treaters.  I'm not much for the really scary stuff.  So today I thought I'd share some treat bag tags that feature some adorable cupcakes!
Wouldn't these be perfect party favors or to hand out to special trick-or-treaters? Even if you don't have little ones, these make fun treats.  I don't have small children anymore, but love making treat tags, bags and holders to give out at my Bunco group around holidays.  (I think I know what they'll be getting in October!)  And these would be perfect for co-workers. 
I started by gathering the orange and black cardstock and then finding various patterned papers to match.  I die cut the cupcake pieces from the Spooky Cupcakes die, the bats from the Halloween Pedestal die and the two largest tags from the Mail Tag Set.  When making multiples of things I use plastic containers or a muffin tin to organize my pieces.  I put all the die cuts for one card or tag in one container or muffin cup.  It really keeps things organized!
I laid the smaller tag on top to get the placement of the sentiment correct and then I heat embossed it underneath.  Afterwards I glued the smaller tag to the larger one.
For the cupcake itself, I used two shades of brown and shaded the sides with a sponge dauber and Chocolate Chip ink.
Then I assembled the cupcakes and glued them to the tags.  For the batty cupcake I added some sequins.

Remember - the new dies will be available September 20 and the website ordering will be down until that date due to the big move to a larger space.  Keep that wish list going!

Have a great weekend and I hope I've inspired you to do something creative!
 

http://www.scrappingcottage.com/cottagecutzmailtagset.aspx